The good news is you don't need a fancy workshop or a big budget to get this right. A solid hand tool organization system can be set up in an afternoon with materials that cost anywhere from nothing to a couple hundred dollars, depending on how far you want to take it. Here's how to do it the right way from the start – or fix a chaotic setup that's gotten out of hand.
Why Most Tool Organization Fails
Most people's tool situation unravels not because they're disorganized by nature, but because they don't have a system – they have a spot. Everything goes "in the toolbox" or "in the drawer" with no further logic applied. Then the toolbox fills up, tools start living on the workbench, and gradually the system becomes "I'll just look everywhere until I find it."
The other common failure is buying organization solutions before knowing what you have. A beautiful pegboard setup or a multi-drawer tool chest means nothing if the organizing principle behind it doesn't match how you actually work. The goal is to build a system around your tools and your habits, not to make your garage look like a hardware store showroom.
Step 1: Do a Full Tool Inventory First
Before you buy anything or install anything, pull every hand tool you own into one place. This includes the toolbox, the junk drawer, the garage shelf, the kitchen drawer where spare stuff migrates, and anywhere else tools tend to accumulate. Lay everything out on a table or the floor where you can see it all at once.
As you do this, sort into three categories: tools you use regularly, tools you use occasionally, and tools you haven't touched in years or don't recognize. That third category is usually bigger than expected. Duplicates are common too – most households end up with four flathead screwdrivers and zero hex keys, or three tape measures but no wire stripper. The inventory step tells you what you're actually working with and often reveals the gaps in your collection alongside the clutter.
Once everything is laid out, wipe down the tools that need it and set aside anything that's broken, rusted beyond use, or genuinely has no purpose in your life. Donate or toss those. You're building a system around tools you'll actually use, not a museum of everything you've ever owned.
Step 2: Group by How You Use Them
The most functional tool organization systems are built around use, not category. A hardware store organizes by product type because they're a store. You organize by how you work because you're the one doing the projects.
Think about the tasks you do most often. If you're frequently doing small household repairs – tightening hinges, swapping outlet covers, hanging pictures – your most-reached-for tools are probably a multi-bit screwdriver, a hammer, a tape measure, a utility knife, and a level. Those should all live together in the easiest-to-access spot in your system, not scattered across different drawers.
Group the rest of your tools by project type or work category. Plumbing tools together (pipe wrench, adjustable pliers, plumber's tape). Electrical tools together (voltage tester, wire strippers, needle-nose pliers). Painting and patching tools together. This way, when you're tackling a specific job, you grab the relevant group instead of hunting across the whole system.
Step 3: Choose Your Storage Method
There's no single right storage method – the best one depends on your space, your budget, and how many tools you have. Here are the most practical options for homeowners:
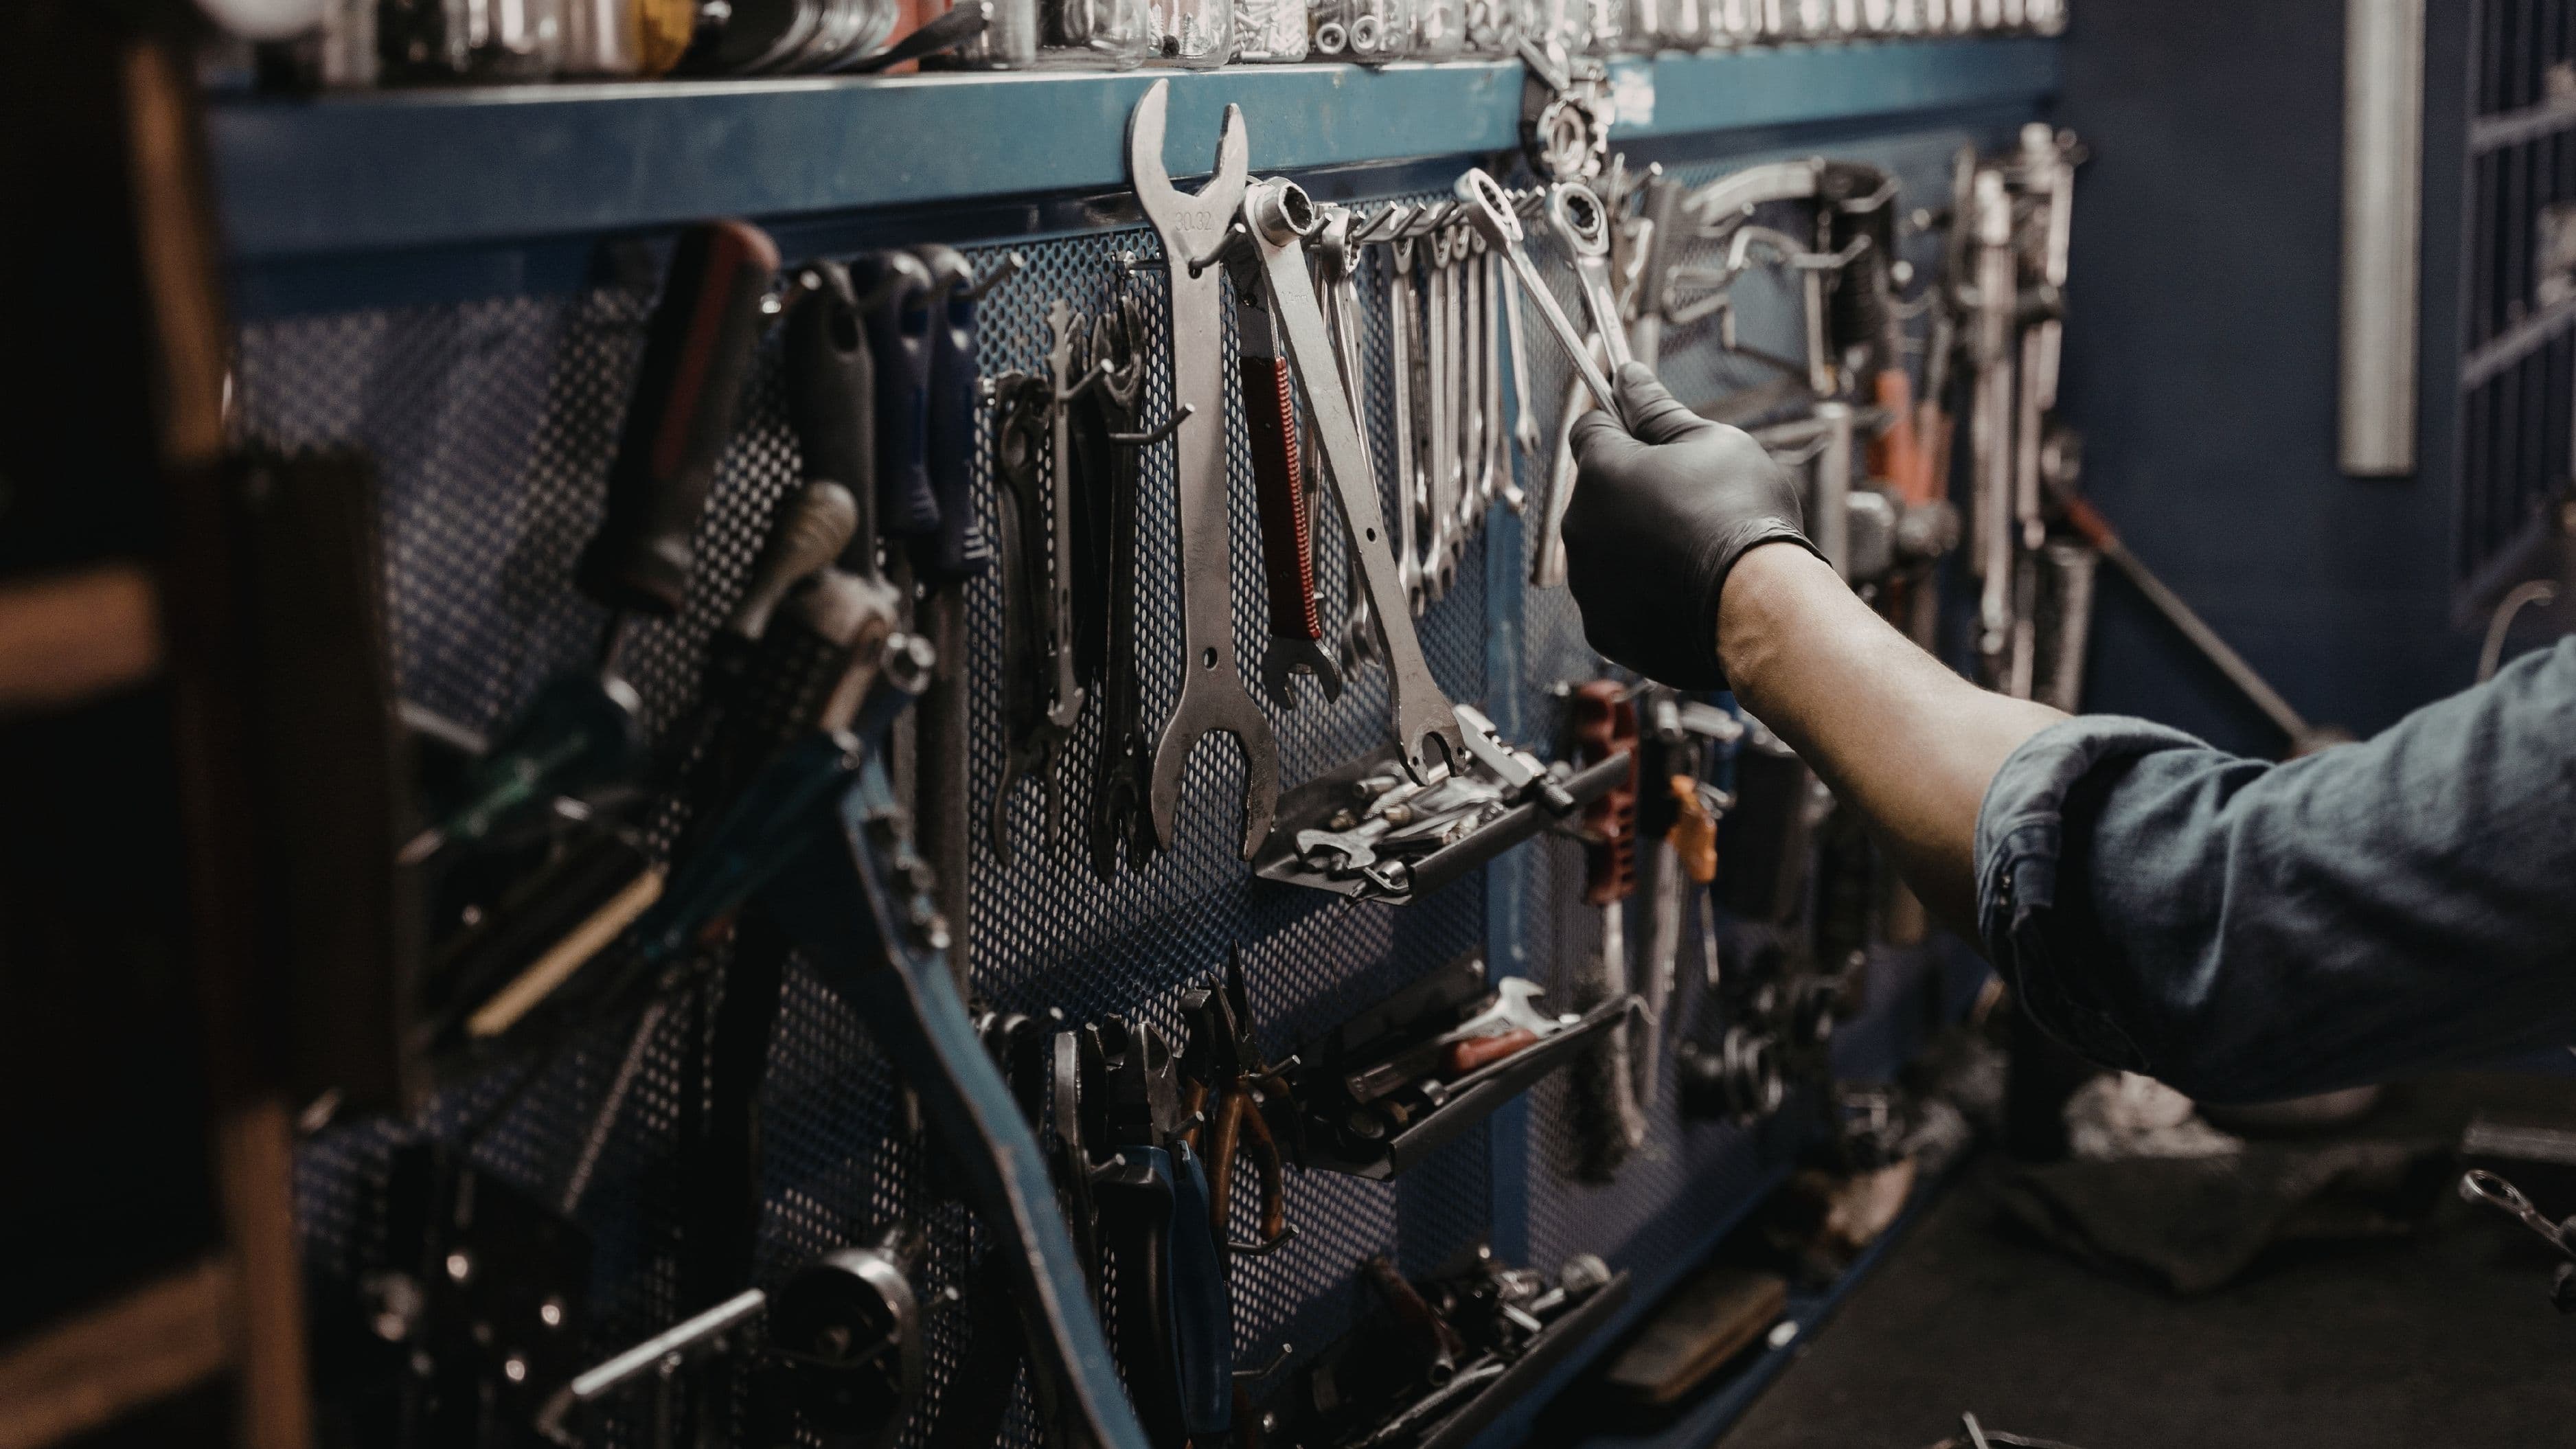
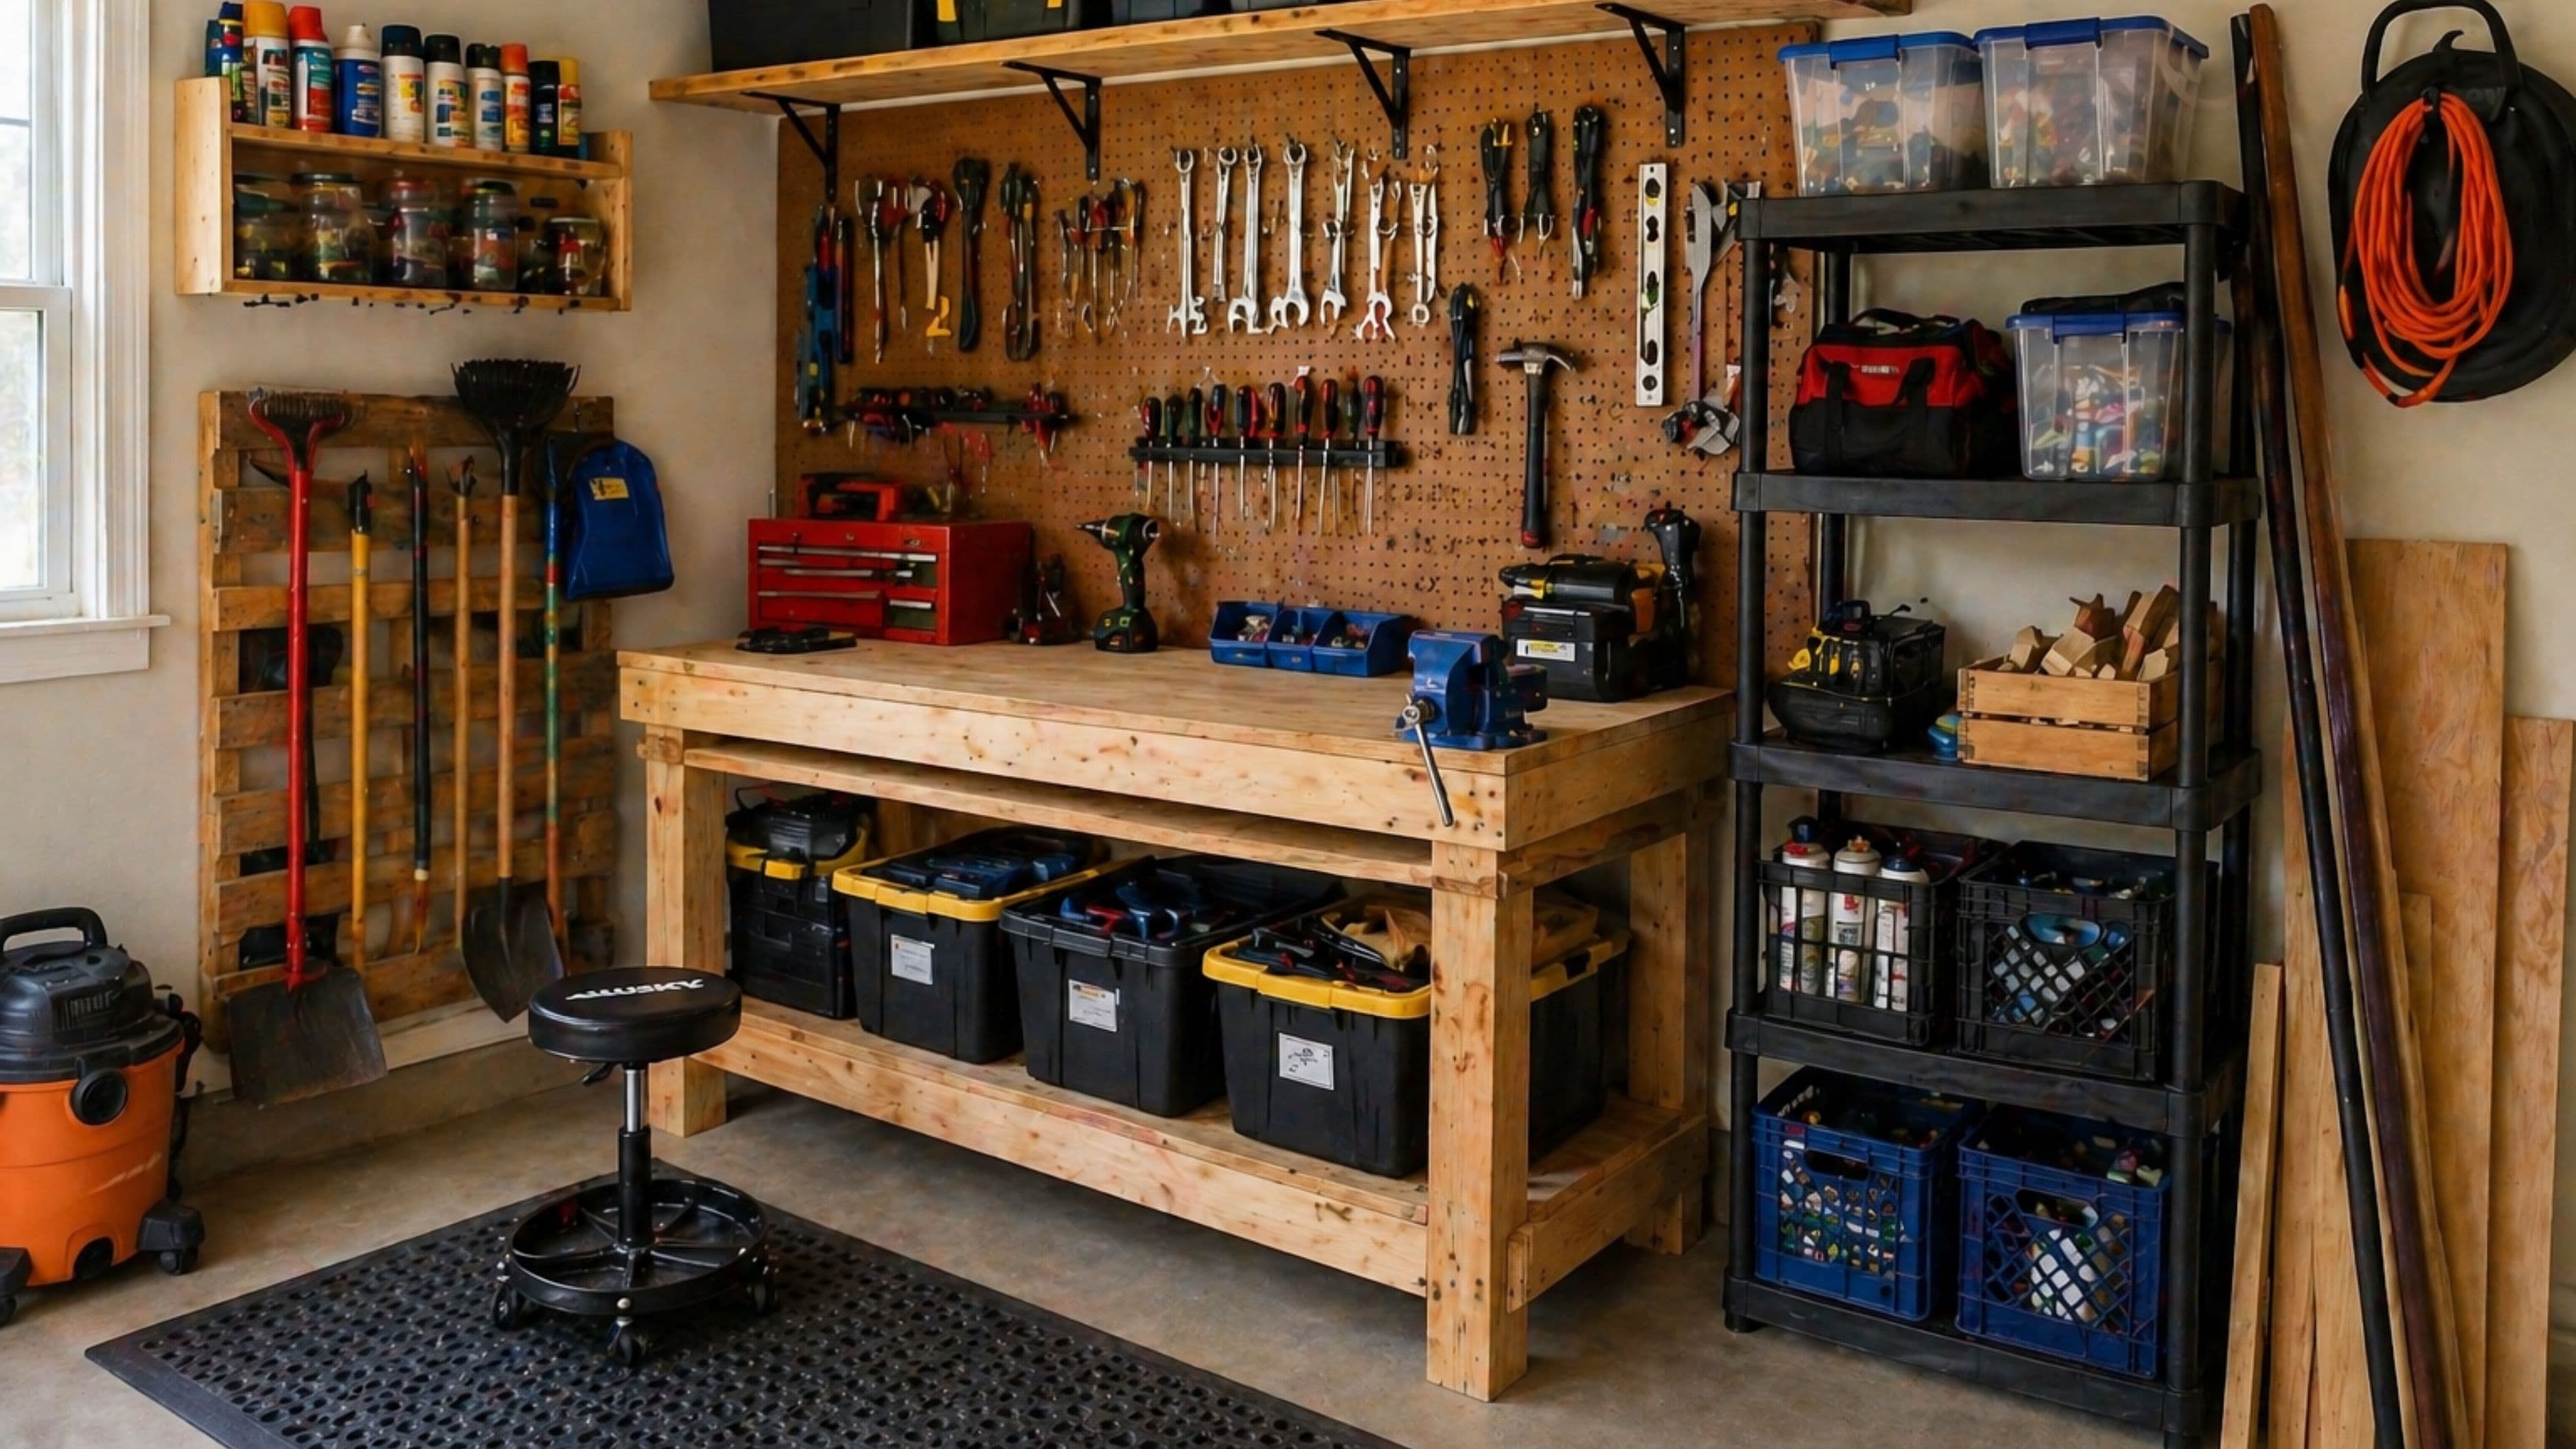
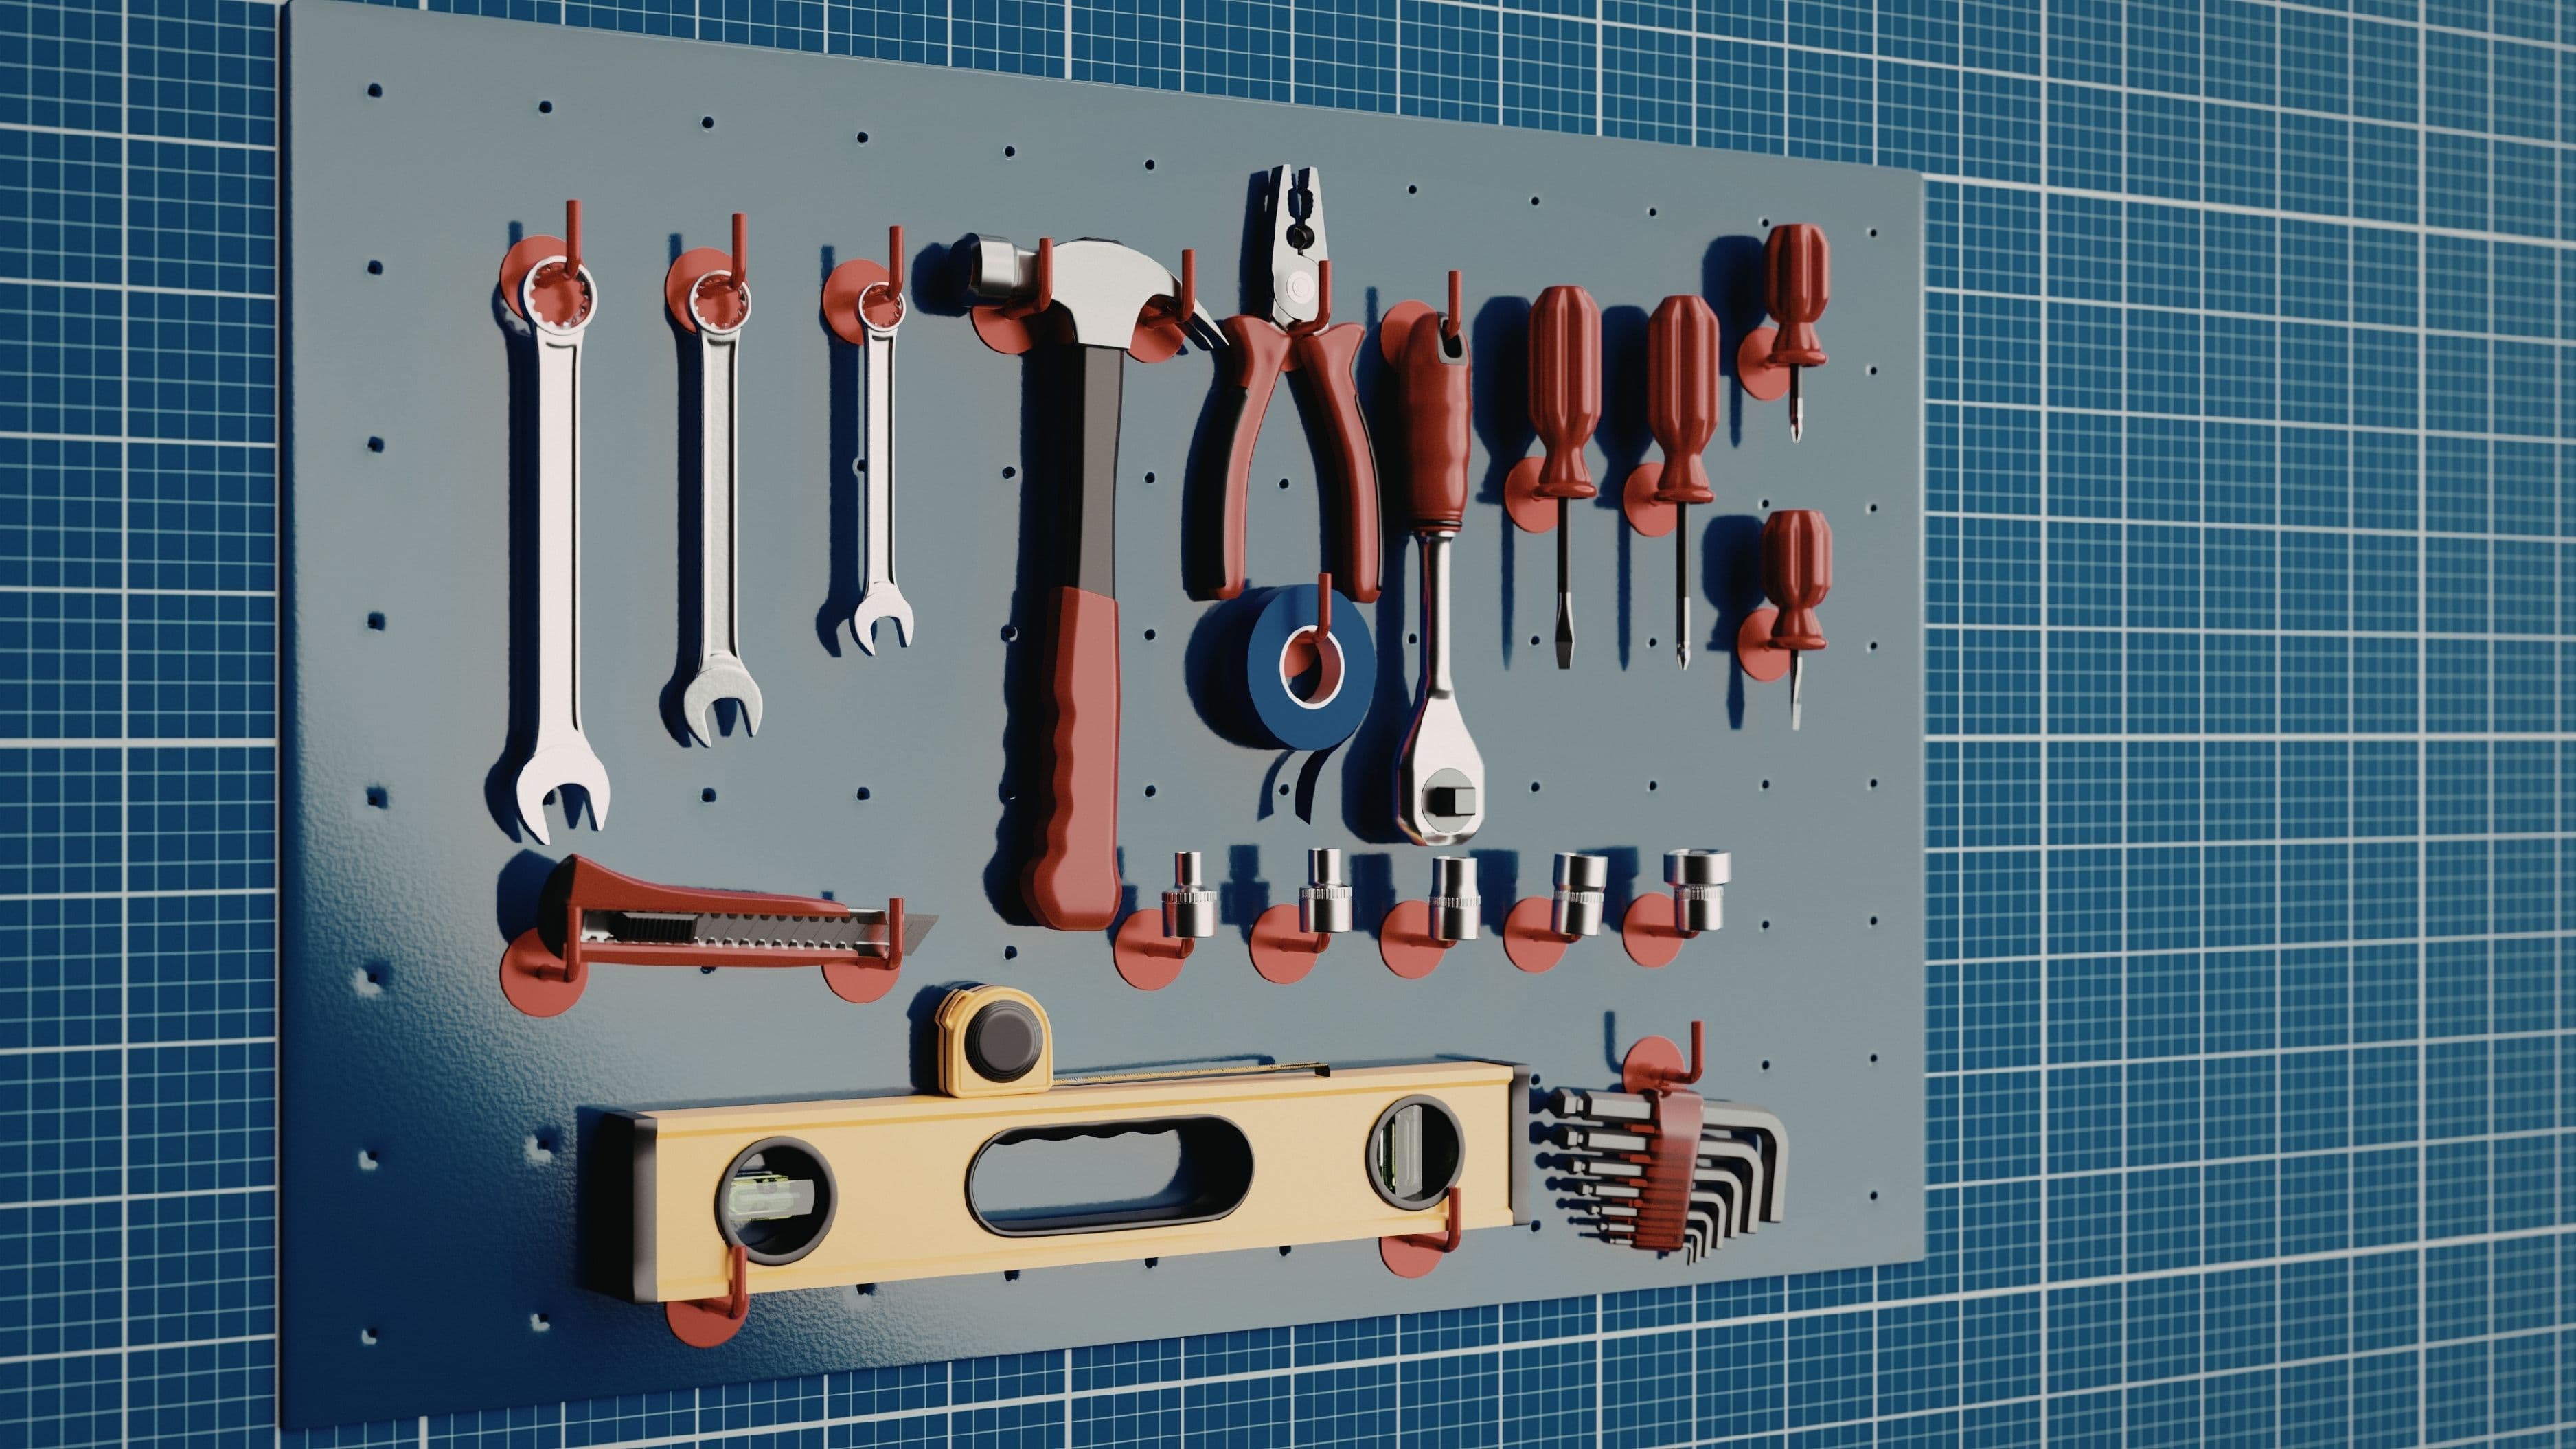
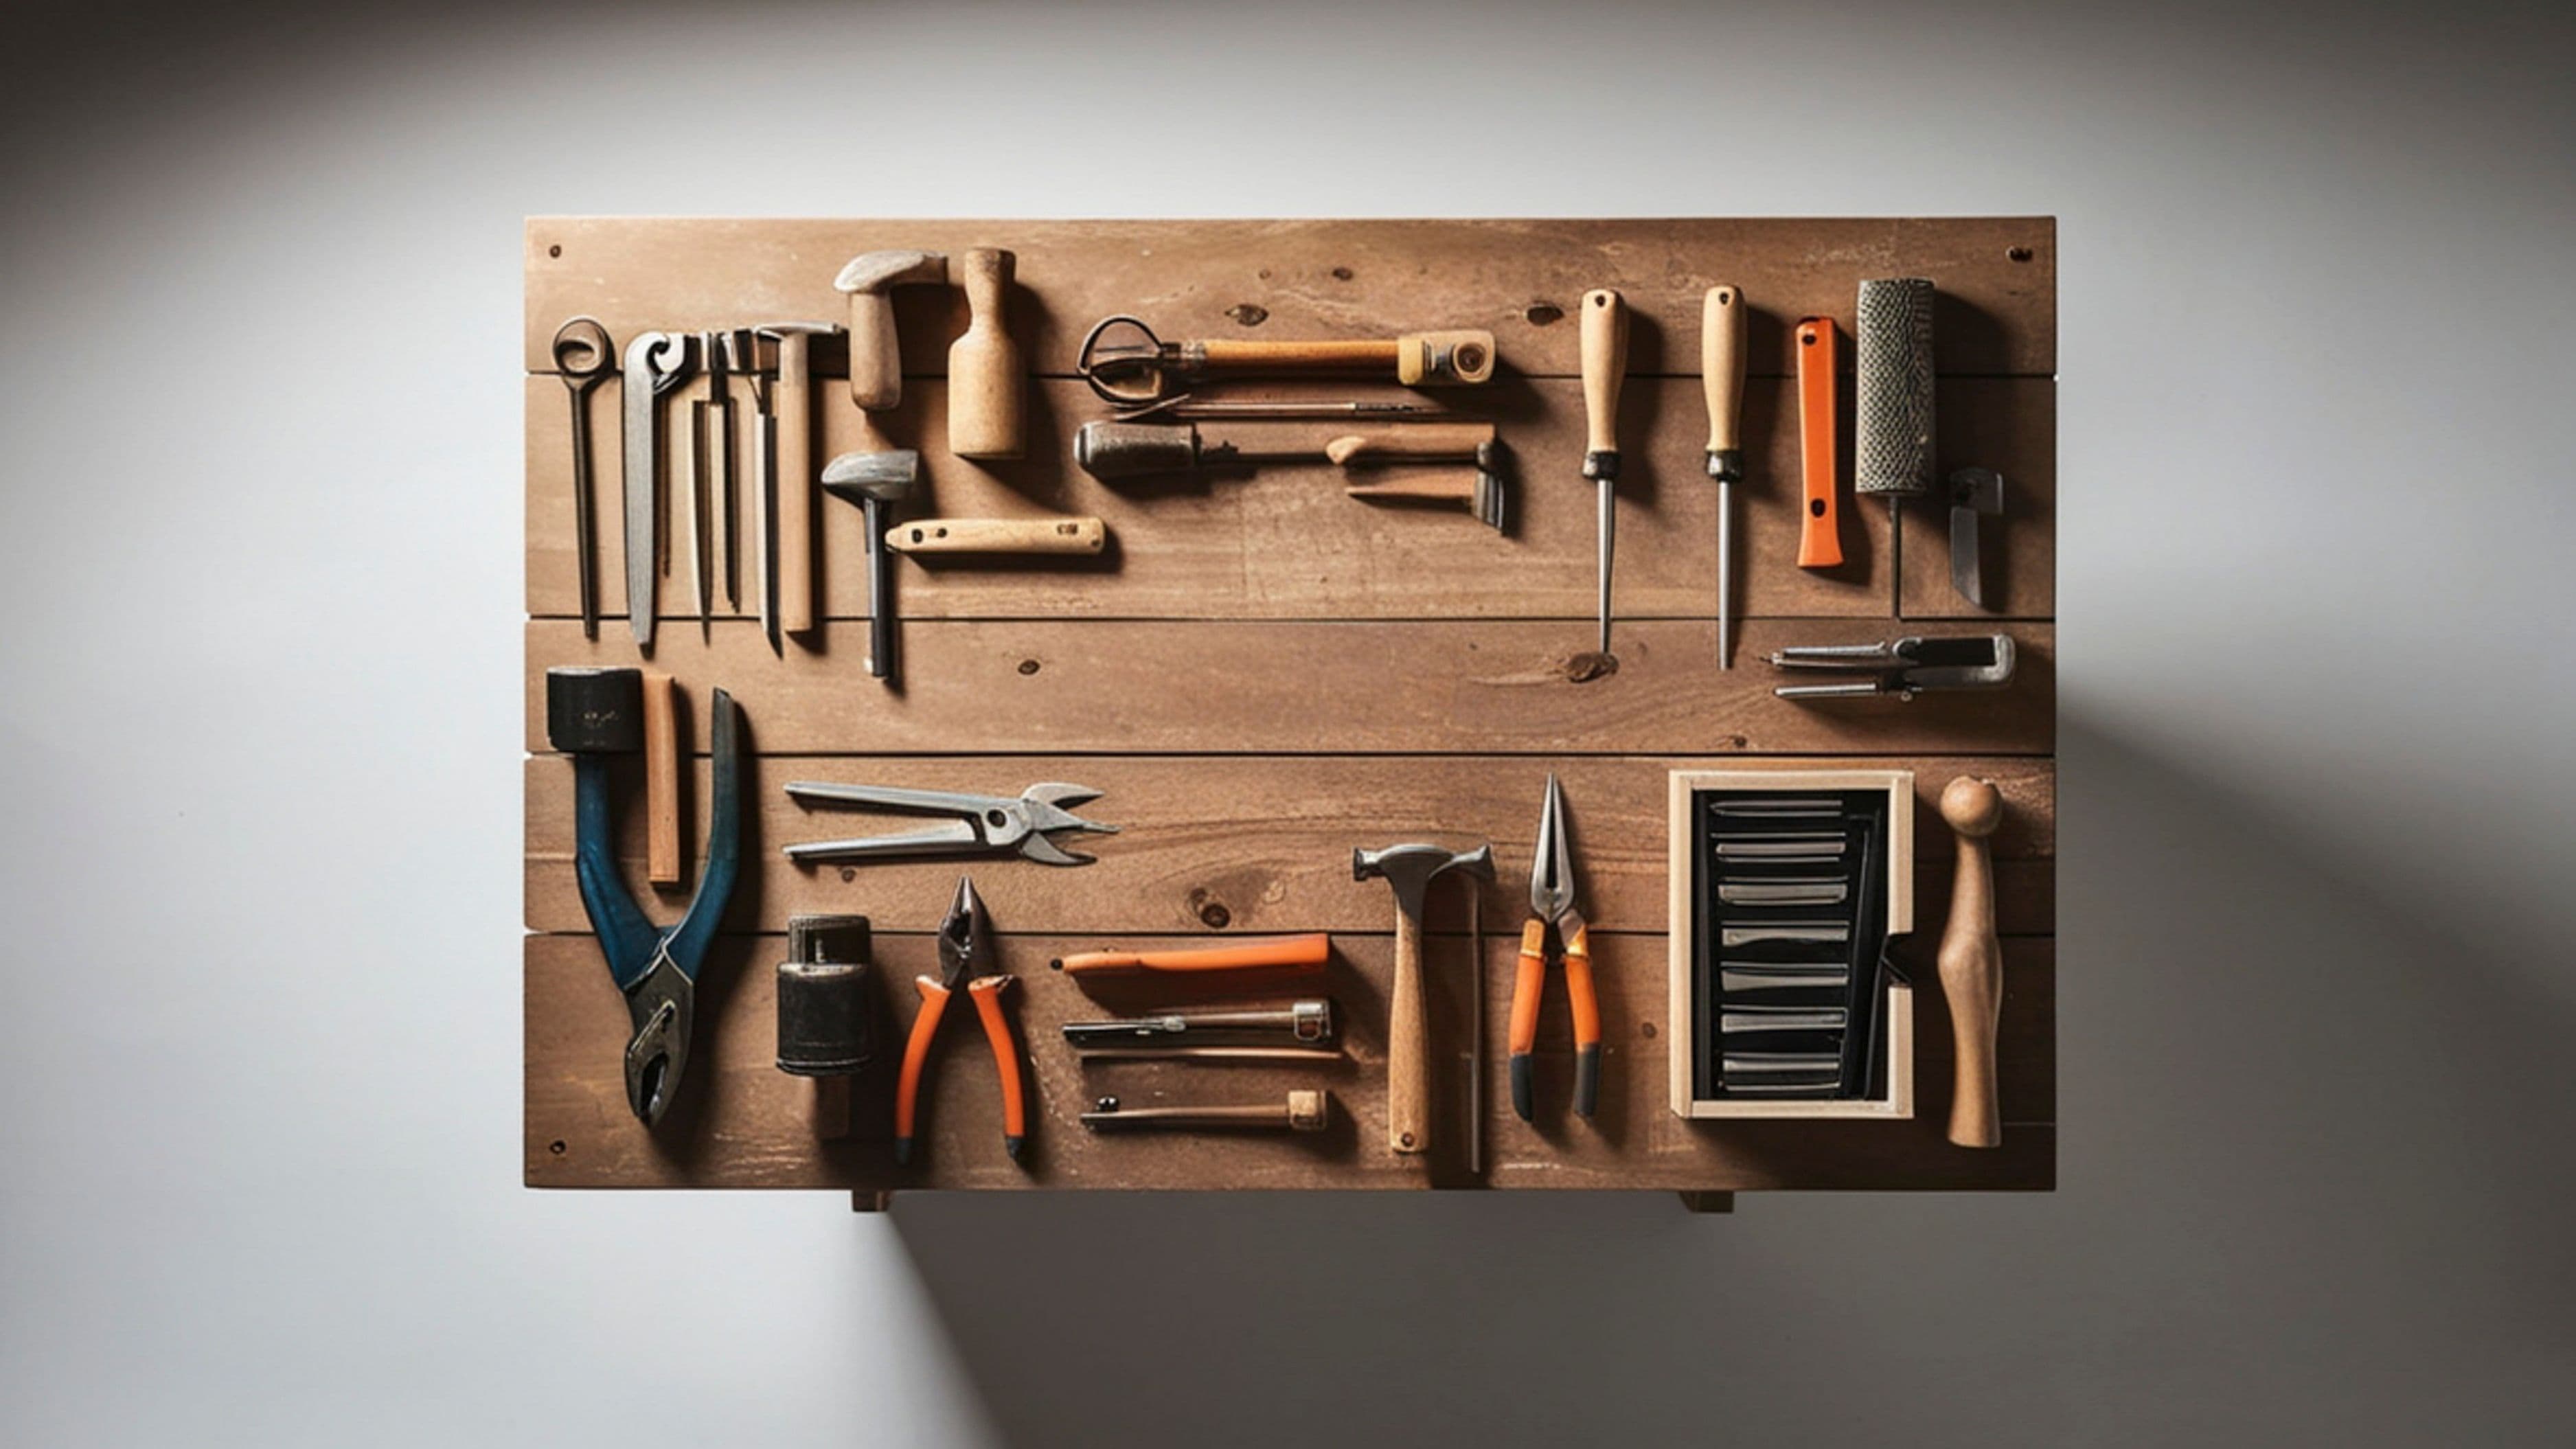
Pegboard on a wall is one of the most efficient setups for a garage or workshop area. It keeps tools visible at a glance, off the workbench, and easy to grab. The key to making pegboard work is using an outline system: trace or paint the silhouette of each tool on the board behind its hook. That way you can see instantly what's missing and where everything belongs when you put it back. Pegboard is affordable – a 4×4 foot panel costs around $15 to $25 at hardware stores – and it scales as your collection grows. Use a variety of hooks, holders, and bins to accommodate different tool shapes.
A rolling tool chest with drawers works well for larger collections and makes sense if you move between work areas or want tools near where you're working. Dedicate each drawer to a category: one for screwdrivers and bits, one for pliers and cutters, one for measuring and marking tools, one for wrenches and socket sets. Label the outside of each drawer so you don't have to open all of them to remember what's where. Deep drawers are most useful when lined with non-slip drawer liner to keep tools from shifting around every time you open and close them.
A wall-mounted magnetic strip is a simple, low-cost solution for frequently used tools that have metal components – screwdrivers, chisels, files, utility knives. A 24-inch magnetic strip can hold 15 to 20 tools flat against the wall within easy reach of your work surface. It's not a complete storage solution but it works well as a "daily driver" strip for your most-used items.
A portable tool bag is worth having even if you have a larger storage setup. When you're doing a repair somewhere in the house, you want to carry what you need without lugging the whole chest. A good tool bag with pockets – not a generic tote, but one with dedicated loops and pockets for specific tools – means you can grab a curated set for the job and stay organized away from your main storage area.
Stackable bins and cans on a shelf are the right solution for smaller hand tools and accessories: hex keys, paint brushes, drill bits, screws and hardware, zip ties, sandpaper. Clear plastic bins let you see what's inside at a glance. Label everything, even if it seems obvious now – six months from now, you'll be glad it's labeled.
Step 4: Apply the "One Touch" Rule
Here's the principle that separates a system that stays organized from one that deteriorates within a month: every tool should have exactly one home, and putting it back should take one motion. If returning a tool to its home requires opening a drawer, moving another tool, finding the right hook, or figuring out where it goes – you'll put it down "for now" instead, and "for now" quickly becomes the new norm.
Pegboard silhouette outlines enforce this naturally. Drawer organizers with dedicated slots do the same thing. When you put a tool back, you're not deciding where it goes – you're returning it to its obvious, specific spot. The less thinking required at the end of a job, the more likely the system stays maintained.
This also means resisting the urge to stack tools on top of each other or cram things in. If you can't fit a tool in its spot without moving something else, your system needs more space – not more tolerance for disorder.
Step 5: Deal With Small Parts Properly
Loose screws, nails, bolts, anchors, wire nuts, and miscellaneous hardware are what quietly destroy tool organization. They end up in the bottom of the toolbox, rattling around in drawers, and collecting in jars with no rhyme or reason. A few minutes sorting these pays off every time you need to find a specific screw without dumping out a whole container.
Small hardware organizers with adjustable dividers – the kind with rows of small compartments – are the right tool for this. Sort by type and size: wood screws together, machine screws together, drywall anchors together, picture-hanging hardware together. Clear lids let you find what you need without opening everything. Label each section with a marker or masking tape. If you end up with screws and fasteners you can't identify or won't use, toss them – a leaner, clearly labeled set of hardware is far more useful than a large disorganized collection.
For drill bits, a dedicated drill bit index (the folding case with labeled slots) is the single most useful accessory you can buy for under $20. Bits that live loose in a drawer are nearly impossible to quickly identify by size, and they get damaged when they rattle against other metal tools.
Common Mistakes to Avoid
Buying storage before doing the inventory is the most common mistake, and it results in a storage solution that doesn't fit your actual tool collection. Do the inventory first, always.
Organizing by size instead of use is another trap. Arranging screwdrivers from smallest to largest looks tidy but tells you nothing useful when you're looking for a specific type in a hurry. Organize by what you use together, not by what looks orderly.
Over-organizing rarely-used tools at the expense of commonly-used ones is a subtle but real problem. Your most-used tools should be the easiest to access – front row, best hooks, top drawer. Specialty tools you use twice a year can live in a less convenient spot.
Not accounting for how tools get dirty is a practical gap many people miss. If your tools come back from a job covered in caulk, paint, or grease, you need a designated clean-before-return spot – a rag, a cleaning station, somewhere to wipe them down before putting them back. A clean tool returned to a clean holder maintains the system. A dirty tool returned to a pegboard leaves residue on everything around it.
What You'll Need to Get Started
Here's a basic supply list depending on the setup you choose:
For a pegboard setup: 4×4 or 4×8 pegboard panel ($15–$40), pegboard hooks and holders (assorted kit, $15–$25), wall anchors and screws, spray paint for silhouette outlines (optional), and 1×4 lumber spacers to mount the board slightly off the wall so hooks have room to seat properly.
For a drawer-based setup: non-slip drawer liner ($10–$15 for a roll), adhesive label tape or a label maker ($15–$25), foam drawer inserts or a cutlery tray-style organizer for small tools.
For a magnetic strip: a heavy-duty magnetic tool bar in the 18 to 24-inch range ($15–$30), appropriate wall anchors for your wall type.
For hardware storage: a multi-compartment small parts organizer ($10–$20), a drill bit index ($15–$25), clear stackable bins with lids for larger accessories.
Total investment for a solid basic setup: $50 to $150, depending on what you already have and how large your tool collection is.
FAQ
How do I organize tools if I don't have a garage or workshop? A wall-mounted pegboard or magnetic strip inside a utility closet works well in smaller spaces. A slim rolling tool chest can fit in a closet or laundry room without taking up much floor space. For apartments, a good-quality portable tool bag or a dedicated shelf in a storage closet with labeled bins keeps things manageable without requiring dedicated workshop space.
Is it worth buying a tool chest, or is pegboard enough? For a modest hand tool collection (under 50 tools), pegboard plus a small portable bag is usually sufficient and more cost-effective. If your collection includes socket sets, power tool accessories, measuring equipment, and a larger range of specialty tools, a tool chest with drawers provides better organization, dust protection, and capacity. Many people use both – pegboard for frequently used tools, chest for the rest.
How do I stop tools from going missing in my household? The most effective method is a single rule: tools only live in their designated spots, nowhere else. When every tool has a specific home and that's enforced consistently, missing tools stand out immediately because you can see the empty hook or empty slot. The silhouette system on pegboard is particularly useful for this because the absence of a tool is instantly visible.
What's the best way to store screwdrivers specifically? Screwdrivers are one of the most-used and most commonly disorganized hand tools. The best options are a pegboard with individual screwdriver hooks that hold them by the handle, a wall-mounted screwdriver rack, or a dedicated screwdriver roll that keeps them together and portable. Avoid storing them loose in a drawer where the tips contact each other – this dulls the tips over time and makes it hard to find the right one quickly.
Should I label everything? Yes, especially for drawers, bins, and storage containers where the contents aren't immediately visible. Labels take two minutes to apply and save significant time and frustration over years of use. Even if it feels obvious right now, your future self during a stressful repair will appreciate not having to think about it.
A well-organized tool setup isn't about aesthetics – it's about making every repair and project easier from the moment you start. Once you have a system where every tool has a specific home and returning it there takes one motion, you'll wonder how you tolerated the old chaos. Set it up once, maintain it consistently, and the time you save on every single project from that point forward adds up fast.
📚 Sources
Family Handyman. How to Organize Your Garage Tools. https://www.familyhandyman.com/list/garage-organization-tips/
This Old House. Best Ways to Organize a Workshop. https://www.thisoldhouse.com/garages/21018224/tool-storage-ideas
The Spruce. The Best Tool Storage Solutions for Every Space. https://www.thespruce.com/best-tool-storage-solutions-5115261
Popular Mechanics. How to Build a Pegboard Tool Organizer. https://www.popularmechanics.com/home/interior-projects/how-to/a5986/4323823/
Fine Homebuilding. Shop Organization Tips From the Pros. https://www.finehomebuilding.com/project-guides/tools-materials/shop-organization
Bob Vila. Tool Storage Ideas for Every Homeowner. https://www.bobvila.com/articles/tool-storage-ideas/
Consumer Reports. How to Choose the Right Tool Chest. https://www.consumerreports.org/storage-organization/how-to-choose-the-right-tool-chest/
DIY Network. Garage Storage and Organization Ideas. https://www.diynetwork.com/how-to/rooms-and-spaces/garage/garage-storage-and-organization-ideas
Ask This Old House. Workshop Organization 101. https://www.thisoldhouse.com/garages/21161302/workshop-organization
OSHA. Hand and Power Tool Safety Guidelines (General Reference). https://www.osha.gov/hand-power-tools
🔍 Explore Related Topics