The short answer is yes, repairing is almost always cheaper than replacing — but only when the damage is limited and the underlying floor is still in decent shape. When repairs stop making sense, they can actually cost you more in the long run if they delay a replacement that was already overdue. This guide walks you through how to tell the difference, what repairs actually cost, and when it's genuinely worth calling it.
What Type of Vinyl Flooring Do You Have?
Before you decide anything, you need to know what you're working with — because vinyl flooring comes in a few different forms, and the repair options vary significantly between them.
Sheet vinyl is the oldest and most common type in homes built before the 2000s. It comes in large rolls and is either glued down fully or perimeter-glued. Tears, bubbles, and gouges are repairable, but large damaged areas are harder to patch invisibly because you're working with a single continuous surface. Finding a matching piece for a patch can also be difficult if the floor is more than a few years old.
Vinyl composition tile (VCT) is the classic 12-inch square tile used in many kitchens and utility rooms. Individual tiles can be removed and replaced relatively easily, which makes spot repairs very DIY-friendly. The main challenge is matching the color and pattern of older tiles.
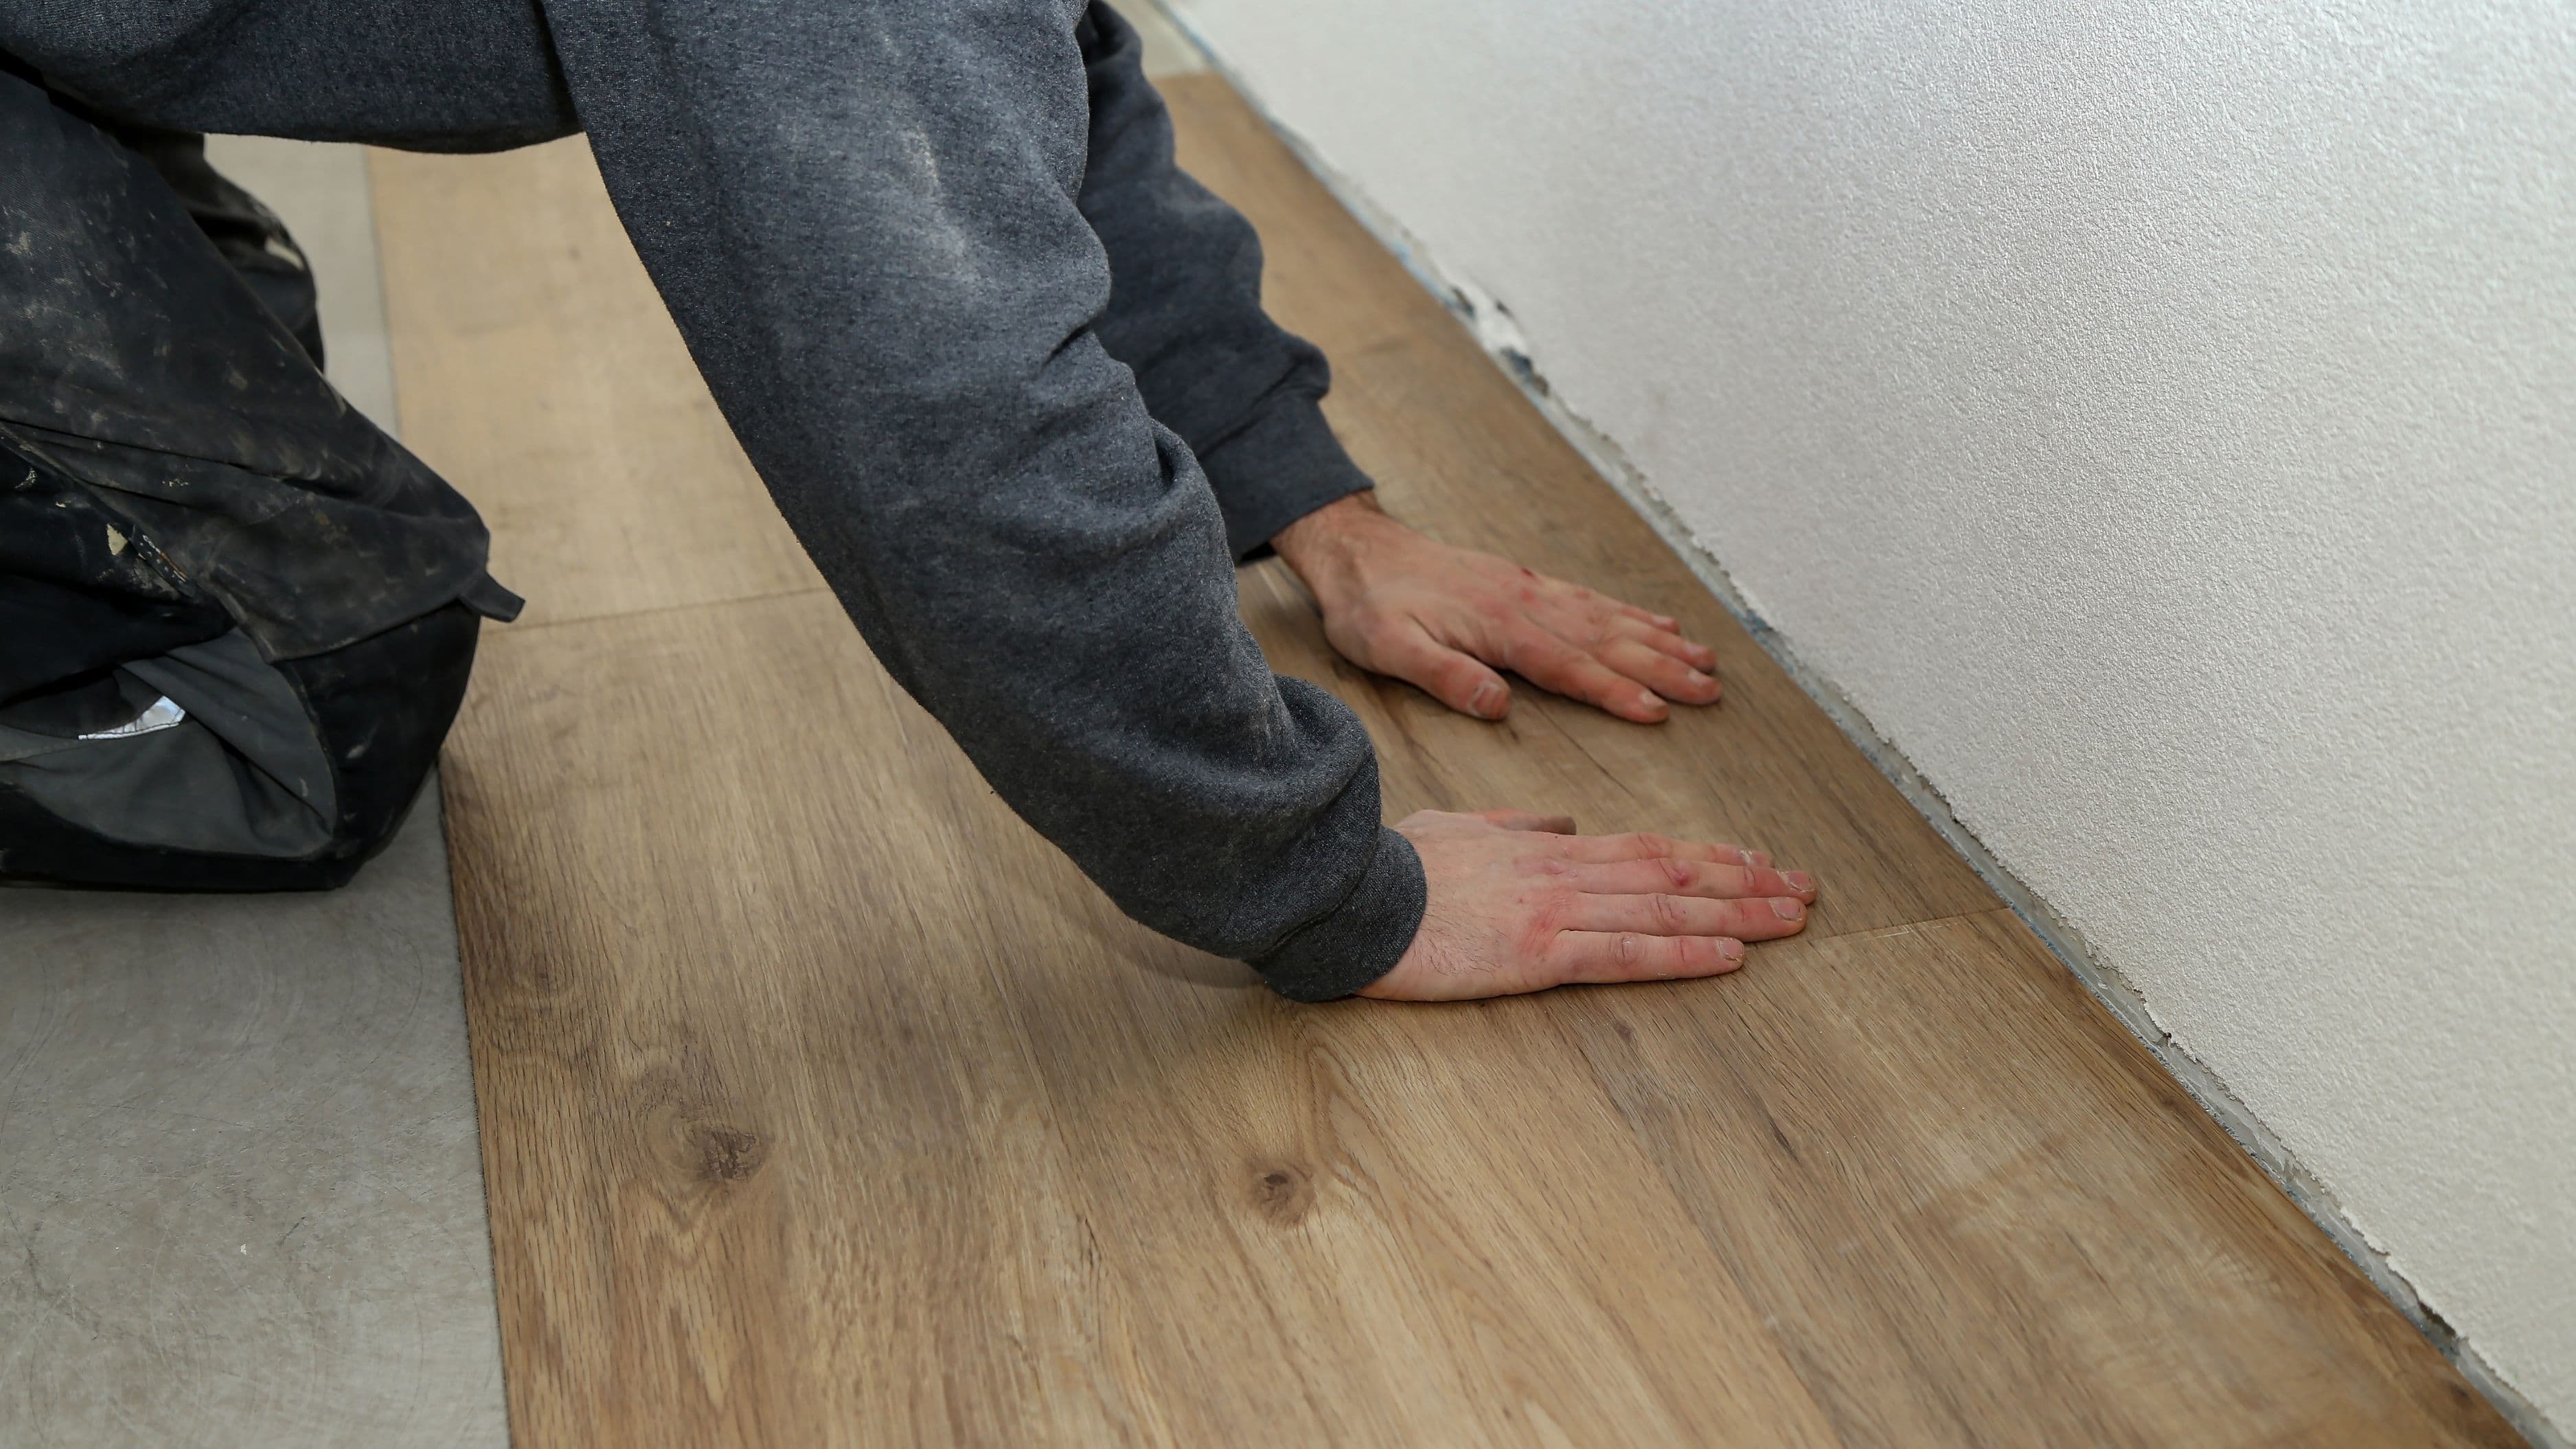
Luxury vinyl plank (LVP) and luxury vinyl tile (LVT) are the newer floating-floor systems with click-lock or glue-down installation. Floating LVP allows individual planks or tiles to be replaced without disturbing the rest of the floor — making it the most repair-friendly vinyl type of all.
Knowing your type changes the difficulty and cost estimate significantly. Sheet vinyl repairs are the trickiest. LVP repairs are often straightforward enough for a first-time DIYer to handle in an afternoon.
Common Vinyl Flooring Problems and What They Actually Cost to Fix
Bubbles and Lifting Seams
Bubbles form when the adhesive underneath sheet vinyl loses its bond — usually from moisture, age, or a floor that was installed without proper acclimation. A small bubble (under 6 inches) is one of the easiest vinyl repairs you can do. The fix involves injecting floor adhesive under the bubble using a syringe, pressing the surface flat, and weighting it overnight.
Cost to DIY: Under $15 for a tube of vinyl floor adhesive. Time: about 15 minutes of work, then overnight curing. A similar repair by a pro would run $75–$150 for a service call, so this is a case where DIY clearly wins.
Lifting seams along edges or between sections are handled similarly — clean the area, apply seam sealer or adhesive, press flat, and tape or weight until cured. Seam sealer costs around $10 and is widely available at hardware stores.
Cuts, Tears, and Surface Gouges
Small cuts and scratches in vinyl can often be filled and blended with a vinyl floor repair compound or color-match filler. These are available at most home improvement stores for $10–$25 and come in a range of colors. The repair is never completely invisible on close inspection, but for practical purposes — meaning you stop seeing it after the first week — it works well for small damage areas.
For a larger tear or a significant gouge, the better approach is a patch repair. You cut out the damaged section in a regular shape (square or rectangle), find a matching piece of vinyl from a remnant or a hidden area like inside a closet, and glue the patch in place. Done carefully with a sharp utility knife and the right adhesive, a patch repair can be nearly undetectable. The total cost is typically $20–$50 in materials, and the job takes a couple of hours.
Curling Corners and Edges
Vinyl tiles and sheet vinyl edges curl when the adhesive fails — most often in areas with temperature swings or occasional moisture, like near exterior doors. The fix is simple: warm the curled section gently with a heat gun or hair dryer to make it pliable, apply floor adhesive to the back, press it flat, and weight it for several hours.
This is a $10 repair that takes 20 minutes. Left unaddressed, a curling edge becomes a trip hazard and typically gets worse — the vinyl dries out further, cracks, and becomes harder to bond down cleanly. Catching it early is the right call.
Staining and Discoloration
Some stains in older vinyl are permanent — particularly those caused by rubber-backed mats (which cause a chemical reaction called "antioxidant staining" that etches into the vinyl surface) or certain strong solvents. If the staining is isolated to one area, a patch repair is your best option. If it's widespread, cleaning and restoration products for vinyl can improve appearances without resolving the underlying discoloration.
Be honest with yourself here: if the staining is severe and widespread, no amount of cleaning will make the floor look good again. That's a situation where replacement starts making more economic sense.
When Repairing Makes Sense
Repair is the right call when the damage is localized to a small area — a single tile, a corner, a seam, or a bubble — and the rest of the floor is in good condition. It also makes sense when the floor is relatively new, or when you're planning to replace it in the next year or two anyway and just need it to look acceptable in the meantime.
The cost math is straightforward. A full sheet vinyl replacement in an average kitchen (roughly 200 square feet) typically runs $300–$800 in materials plus $200–$600 in labor if you hire out, for a total of $500–$1,400 or more depending on your location and the material quality. LVP replacement costs are similar or higher. A repair that costs $20–$100 and buys you another few years of serviceable floor is obviously the better financial decision if the floor is otherwise holding up well.
When Replacement Makes More Sense
There are situations where repairing is genuinely throwing money at a problem that won't stay fixed. The clearest sign is subfloor damage — if there's moisture damage, rot, or significant unevenness underneath the vinyl, no surface repair will hold. The floor will continue to bubble, lift, and crack until the subfloor is addressed, and at that point you're already tearing up the vinyl anyway.
Age is another factor. Vinyl flooring from before the mid-1980s may contain asbestos, particularly in 9-inch floor tiles. If your flooring is older and you're unsure of its composition, do not sand, cut, or aggressively disturb it without getting it tested first. Asbestos-containing tiles that are in good condition can often be left in place and covered with new flooring, but disturbing them creates a health hazard that's not worth any repair savings.
If more than 25–30% of the floor surface is damaged, lifting, or significantly stained, you've crossed the threshold where patchwork repairs become a never-ending project. At that point, replacement delivers better value over the next five to ten years.
You should also consider replacement if the existing floor is significantly out of style and you're selling the home or renovating the space — a new LVP floor can meaningfully improve the room's appearance and perceived value in a way that a patched sheet vinyl floor cannot.
DIY Repair vs Hiring a Pro
Most vinyl flooring repairs fall well within the capability of a beginner-to-intermediate DIYer. Bubble repairs, seam sealing, corner gluing, and even patch repairs all require basic tools — a utility knife, a heat gun or hair dryer, a notched trowel for adhesive, and the patience to let things cure properly. None of these jobs require specialized skills or expensive equipment.
Where a pro makes sense is when you're dealing with large-area sheet vinyl damage requiring a seamless patch, or when the subfloor needs work before the vinyl repair can hold. Subfloor leveling and repair is one of those jobs where improper technique causes problems downstream, so if you find soft spots, significant moisture damage, or floor that flexes under your weight, call a flooring contractor for an assessment before you invest in surface repairs.
A typical flooring contractor charges $50–$100 per hour for repair work, and most small repair jobs take 1–2 hours. That's a reasonable expense for a repair you're not confident doing yourself, and far less than the cost of a full floor replacement.
What to Avoid
Don't use regular household adhesives on vinyl flooring. Standard wood glue, construction adhesive, or super glue will either fail quickly, damage the vinyl, or make future repairs significantly harder. Use products specifically labeled for vinyl floor repair or vinyl floor adhesive.
Don't skip the weighting step. Adhesive repairs that aren't held in place while curing tend to re-lift, especially in areas with foot traffic or temperature changes. A few books, a bag of sand, or a heavy box left in place overnight is the difference between a repair that lasts and one that peels up again in three months.
Don't patch over moisture. If there's moisture underneath your vinyl — indicated by a soft or spongy feel underfoot, a musty smell when the floor lifts, or visible water damage — fixing the moisture source comes first. Gluing vinyl back down over a wet subfloor traps the moisture, accelerates rot, and usually results in the same problem reappearing within weeks.
And don't assume old 9-inch vinyl floor tiles are asbestos-free. If you're in an older home and the tiles are that size, have them tested before cutting or sanding them. Testing kits are available at hardware stores for under $30, or a certified inspector can test them for you.
FAQ
Can I repair vinyl flooring myself with no prior experience? Yes, for most common repairs. Bubble repairs, curling corners, and small patch jobs are beginner-friendly. Watch a few instructional videos before you start, work slowly, and don't rush the curing time. The tools and materials are inexpensive and available at any hardware store.
How long will a vinyl floor repair last? Done correctly, a bubble or seam repair can last for years without re-lifting. Patch repairs on sheet vinyl can last the remaining life of the floor if the adhesive bond is solid and the subfloor is in good shape. The repair is only as durable as the conditions around it — if moisture or subfloor issues aren't addressed, the repair will fail repeatedly.
My vinyl floor is 30+ years old. Should I bother repairing it? That depends on its condition. If it's in reasonable shape overall and the damage is minor, a quick repair is still cheaper than replacement. If it's brittle, heavily stained, or widely damaged, replacement is likely the better investment — especially since new LVP flooring is durable, affordable, and much easier to maintain.
Can I put new flooring directly over old vinyl? In many cases, yes — as long as the existing vinyl is flat, firmly bonded, and no more than one layer deep. New LVP floating floors can typically go over old vinyl without removal. However, if the existing vinyl is loose, uneven, or thicker than recommended by your new flooring's installation guidelines, it needs to come up first.
What's the best way to find matching vinyl for a patch? Check the back of the floor for manufacturer markings, then search by that name or pattern. Hardware stores and flooring suppliers often have discontinued pattern samples or remnants. If you can't find a match, consider taking a piece from an inconspicuous area — inside a closet or under an appliance — and using it for the visible repair, then patching the hidden area with the best available match.
Repairing old vinyl flooring is almost always the right first move when the damage is limited. The materials are cheap, the repairs are doable for most homeowners, and the savings compared to full replacement are significant. The key is being honest about what you're working with — a floor that's structurally sound with minor damage is a great candidate for repair. A floor that's failing across a wide area, sitting on a compromised subfloor, or well past its serviceable life is telling you something replacement can fix and repair can't.
📚 Sources
Bob Vila – How to Repair Vinyl Flooring: https://www.bobvila.com/articles/how-to-repair-vinyl-flooring/
This Old House – Vinyl Flooring Repair Guide: https://www.thisoldhouse.com/flooring/21015842/how-to-repair-vinyl-flooring
U.S. EPA – Asbestos in the Home: https://www.epa.gov/asbestos/asbestos-home
Family Handyman – How to Fix Vinyl Floor Bubbles: https://www.familyhandyman.com/project/how-to-fix-vinyl-floor-bubbles/
HomeAdvisor – Vinyl Flooring Installation and Repair Cost Guide: https://www.homeadvisor.com/cost/flooring/install-vinyl-flooring/
Armstrong Flooring – Vinyl Floor Care and Maintenance: https://www.armstrongflooring.com/residential/en-us/care-maintenance/floor-care-basics.html
🔍 Explore Related Topics